
Soups & Stews
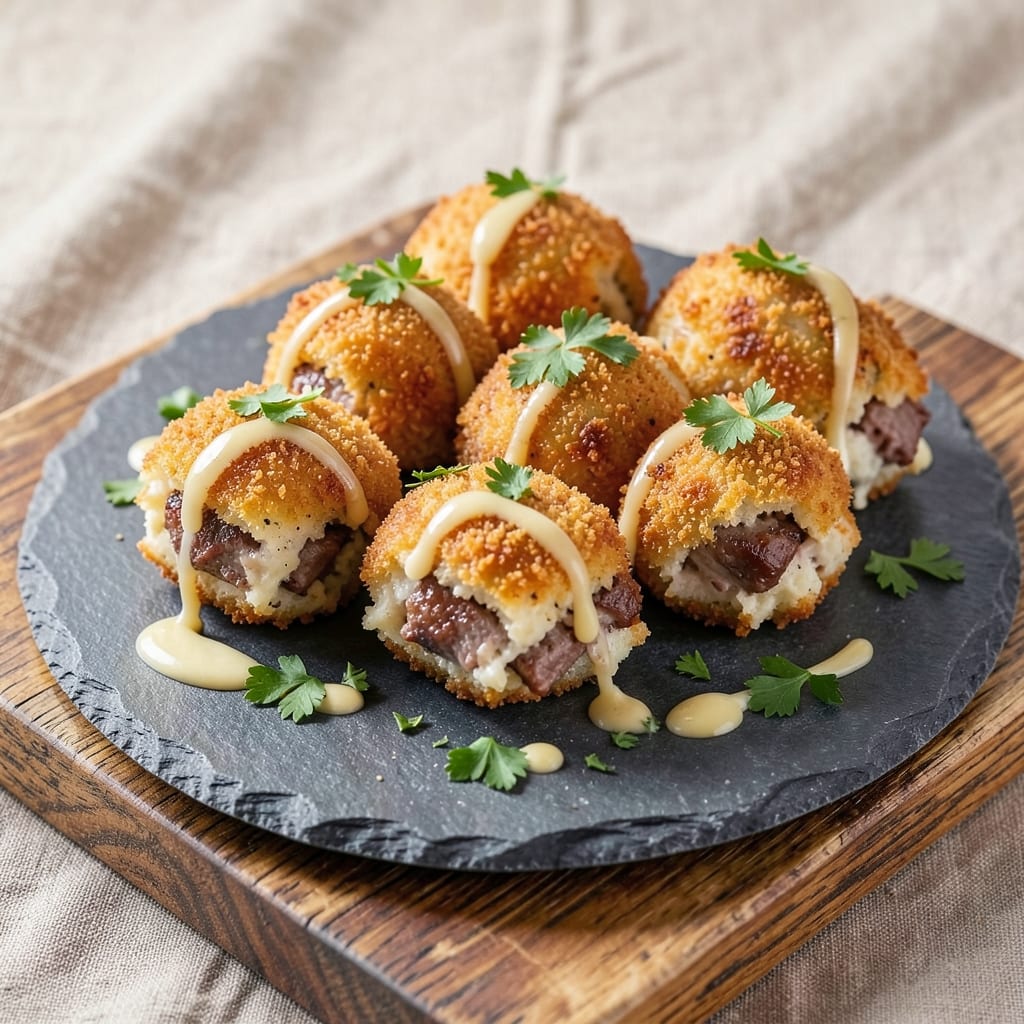
This beef and potato croquette recipe delivers the perfect balance of crispy golden crusts and herby, savory filling—every bite is a satisfying contrast. 💛 The secret lies in cooking the filling just until tender, then shaping it into perfect cylinders before a double-frying process that guarantees that irresistible crunch. I developed this version after testing countless methods, and it never fails to impress.
What sets these croquettes apart is the rich beef and potato filling, seasoned with garlic, thyme, and a touch of Worcestershire sauce for depth. The breading is simple but effective—a mix of flour, eggs, and panko—that creates a shatteringly crisp exterior while keeping the inside warm and hearty. This method works equally well for traditional frying or air-frying, making it versatile for any kitchen.
By the time you serve these, you’ll have golden, crispy croquettes with a filling that’s tender yet flavorful, perfect for dipping in tartar sauce or serving as a main dish. The aroma alone will have everyone gathered around the table, and the texture—crispy outside, creamy inside—is pure comfort food at its best.
Whether you're hosting a dinner party or just craving a satisfying meal, these croquettes are foolproof and always a crowd-pleaser. Let’s get started on a recipe that’s as rewarding to make as it is delicious to eat.
Ingredients for beef and potato croquette
Golden crusts hide a herby, savory beef-potato filling—this is the secret to perfect croquettes.
| Ingredient | Amount | Notes |
|---|---|---|
| Ground Beef (Chuck) 🥩 | 1 lb | 80% lean for best texture |
| Russet Potatoes 🥔 | 2 large | Peeled and cubed small |
| All-Purpose Flour 🌾 | 1 ½ cups | For breading consistency |
| Large Eggs 🥚 | 2 whole | Room temperature for coating |
| Japanese Panko Breadcrumbs 🍞 | 2 cups | Light and crispy texture |
| Garlic Cloves 🧄 | 4 cloves | Minced for aromatic depth |
| Fresh Thyme Leaves 🌿 | ¼ cup | Chopped finely for herby flavor |
| Worcestershire Sauce 🍶 | 1 tbsp | For umami richness |
| Salt 🧂 | 1 ½ tsp | Diamond Crystal preferred |
| Ground Black Pepper 🌶️ | ½ tsp | Freshly cracked for heat |
| Vegetable Oil 🫒 | 3 cups | For frying (high smoke point) |
| Unsalted Butter 🧈 | 2 tbsp | For filling richness |
| Heavy Cream 🥛 | ¼ cup | For creamy texture |
| Shallot 🧅 | 1 small | Finely diced for subtle sweetness |
| Lemon Zest 🍋 | 1 tsp | Brightens the filling |
The beef and potatoes are the heart of these croquettes. Chuck roast gives the best texture—ground too fine and it gets mushy. Russet potatoes are ideal (their starch binds everything together), but Yukon Golds work too if that's what you've got. For the butter, Plugrá or Land O'Lakes are my go-tos—full-fat is non-negotiable here. The shallot? Trader Joe's has pre-minced ones that save time, but fresh is always better. Thyme is key—fresh from the market has more punch than dried, but if you're using dried, cut the amount in half.
No panko? Toasted white breadcrumbs work in a pinch, but they won't be as crispy. Short on Worcestershire? Soy sauce plus a pinch of sugar mimics the umami. The filling should be just tender—not mushy—before shaping. Undercooked filling = soggy croquettes. For the double-fry, let the oil get to 350°F both times—any lower and the crust won't set properly. Air-frying? 425°F for 8-10 minutes per batch, flipping halfway. The secret to perfect shape? Use a cookie scoop—no rolling by hand!
These stay crispy for about 2 hours at room temperature, but after that, reheat in 375°F oven for 10 minutes to restore the crunch. Freeze uncooked croquettes on a tray first, then transfer to a bag—they'll keep 3 months that way. For serving, I always make a big batch of tartar sauce—it's the perfect dipping companion. Leftovers? Crisp them up in the air fryer—they taste almost as good as fresh!
Why You'll Love This Recipe
- One-Pan Wonder: I swear by this recipe because it’s basically hands-off after the initial mix. Boil the potatoes, brown the beef, and toss everything together—no chopping, no fuss, just a single sheet pan later, you’ve got golden bites.
- Craving-Worthy Crunch: That panko crust on the outside? Chef’s kiss. It’s crispy enough to stand up to ketchup or gravy, but the inside stays tender—like a hug from your grandma’s kitchen, but with way more flavor.
- Lunchbox Hero: Between us, these are my go-to for meal prep. They reheat like a dream (microwave or air fryer, no judgment) and keep perfectly for days. Pack them cold for a picnic or warm them up for a lazy afternoon—no sad, soggy sandwiches here.
- Budget-Friendly Powerhouse: Chuck roast and russets are cheap, but they pack a punch. A pound of beef stretches across multiple servings, and the potatoes soak up all the flavor without breaking the bank. Honestly, it’s the kind of recipe that makes me feel like I’m feeding a crowd without actually spending one.
Step-by-step instructions for beef and potato croquettes
Here's how to create golden, crispy croquettes with a rich herby filling—every bite is pure comfort!
🍳 Step 1: Cook the Potato and Beef Filling
In a large pot, cover the 2 large Russet Potatoes with cold water and add 1.5 tsp Salt. Bring to a boil, then reduce heat to a simmer and cook for 15-20 minutes until fork-tender. Drain well and return to the pot.
In a separate skillet, melt 2 tbsp Unsalted Butter over medium heat. Add the 1 small Shallot and cook for 2 minutes until softened. Add the 1 lb Ground Beef (Chuck), breaking it apart with a spoon, and cook until browned. Drain excess fat, then stir in 4 cloves Garlic Cloves (minced), 0.25 cup Fresh Thyme Leaves, 1 tbsp Worcestershire Sauce, 0.5 tsp Ground Black Pepper, and 1 tsp Lemon Zest. Cook for 2 minutes until fragrant.
Combine the cooked potatoes and beef mixture in a bowl, then mash until smooth. Stir in 0.25 cup Heavy Cream and 2 tbsp Unsalted Butter until fully incorporated. Let the filling cool completely before shaping—this prevents the croquettes from falling apart during frying.
👨🍳 Step 2: Prepare the Breading Station
Set up three shallow bowls: one with 1.5 cups All-Purpose Flour, another with 2 whole Large Eggs beaten with a fork, and the third with 2 cups Japanese Panko Breadcrumbs. Arrange them in order so you can dip each croquette sequentially without cross-contamination.
Here's the thing—room temperature eggs coat better. If your eggs are straight from the fridge, let them sit out for 10 minutes before using. The flour should be light and sifted for an even coating, and the panko should be fresh to ensure maximum crispiness.
🥘 Step 3: Shape and Bread the Croquettes
Divide the cooled filling into 4 equal portions (about ¼ lb each) and shape into 4-inch logs about 1.5 inches thick. Roll each log in your palms to create smooth sides—this helps the breading adhere evenly. Place them on a parchment-lined tray and refrigerate for 15 minutes to firm up slightly.
Working quickly, dip each croquette first into the flour, shaking off excess. Then dip into the beaten eggs, letting any excess drip off. Finally, roll in the panko breadcrumbs, pressing gently to adhere. Place on a wire rack and repeat until all are breaded. Let them rest for 10 minutes—this helps the coating set before frying.
🔥 Step 4: Fry to Golden Perfection
Heat 3 cups Vegetable Oil in a deep skillet to 350°F (use a thermometer—this is critical!). Fry 2 croquettes at a time for 3-4 minutes per side until deep golden brown and crispy. The oil should sizzle gently but not smoke excessively. Use a slotted spoon to flip carefully—don't overcrowd the pan or the temperature will drop.
Transfer fried croquettes to a paper towel-lined plate to drain excess oil. Keep them warm in a 200°F oven while frying the remaining batches. If the oil gets too cool, let it reheat to 350°F before frying more—this ensures consistent crispiness every time.
🍽️ Step 5: Serve Immediately with Dipping Sauce
Serve the croquettes hot with a side of aioli or marinara sauce for dipping. The contrast of crispy exterior and creamy, herby filling is what makes these irresistible. For extra flair, sprinkle with additional fresh thyme leaves right before serving.
Real talk: these croquettes are best eaten fresh out of the fryer. The crust loses its crispiness as they cool, so don't make them ahead of time. If you need to prep ahead, shape the filling and refrigerate it—then bread and fry just before serving.
Pro Tips For Making Beef And Potato Croquette
- Boil Potatoes Till Fork-Tender: I used to pull them out at "soft" and they’d fall apart in the filling. Russets need to be actually tender—pierce with a knife, no resistance—so they hold shape when mixed with beef. Drain well, then let them cool completely before handling, or you’ll end up with a sticky mess.
- Brown the Beef First: Raw ground beef in the filling makes the croquettes dense and greasy. Cook the chuck until it’s deeply browned (5-6 minutes on medium-high), breaking it into small crumbles. This builds flavor and reduces moisture, so your mixture stays firm when frying.
- Chill the Mixture 30 Minutes: Skipping this is how you end up with eggy, crumbly croquettes that fall apart at the first bite. After mixing everything, spread the filling on a tray and refrigerate—this firms up the potatoes and beef so they hold together when breaded. (Yes, even if you’re impatient like me.)
- Use a Mix of Panko and Flour: Pure panko gives a great crust but can be too bulky. For extra crispiness without falling apart, toss the shaped croquettes in flour first (dredge lightly), then dip in beaten egg, then roll in panko. The flour helps the breadcrumbs stick better, and the crust stays intact when frying.
Troubleshooting your beef and potato croquette
Filling Too Wet
If your filling feels too moist after cooking, it’s likely because the potatoes released too much liquid. To fix this, mash the potatoes thoroughly and let the mixture sit uncovered in the fridge for 30 minutes to evaporate excess moisture. I also recommend adding 1 extra tablespoon of flour to the filling to absorb any remaining dampness before shaping. 💧
Breading Not Sticking
Cold filling is the usual culprit when breading won’t adhere. Always let your shaped croquettes rest in the fridge for 15 minutes before breading to firm them up. Another trick? Use cornstarch instead of flour for the first dip—it creates a stickier surface for the egg to cling to. Press the panko gently but firmly to ensure even coverage.
Oil Too Cool
Oil temperature drops when you add too many croquettes at once. Keep your oil at a steady 350°F by frying only 2 croquettes at a time and maintaining space between them. If the oil starts smoking or looks cloudy, let it cool slightly and reheat to the right temperature before continuing. A deep-fry thermometer is worth every penny for this step! 🌡️
Uneven Cooking
If one side is crispy and the other is raw, your croquettes are likely too thick or the oil isn’t hot enough. Shape them to a consistent 1.5-inch diameter and flip them only when they’re deep golden brown. For extra insurance, fry the second side for 1-2 minutes less than the first—this prevents overcooking.
Soggy Texture
Soggy croquettes usually mean the filling was undercooked or the breading absorbed too much oil. To prevent this, cook the potatoes until they’re completely tender (no resistance when pierced with a fork) and ensure the oil is 350°F before frying. After frying, place them on a wire rack instead of paper towels to drain excess oil without steaming.
Air-Fryer Issues
Air-frying croquettes requires patience—they won’t get as crispy as deep-fried versions. Cook them at 425°F for 8-10 minutes, flipping halfway, and spray with 1 teaspoon of oil before and after flipping. For best results, use a two-tier air fryer basket to maximize airflow and avoid overcrowding. 💨
Nutrition facts
Frequently asked questions
Can I make these croquettes ahead of time?
You can prep the filling up to 24 hours ahead and store it in the fridge. For best results, shape the croquettes just before frying—they won't hold their shape as well if made too early. If you need to freeze, shape the filling into logs, wrap tightly in plastic, and freeze for up to 1 month. Thaw overnight in the fridge before breading and frying.
What's the secret to extra crispy croquettes?
The double-frying method is key! First fry at 325°F for 2 minutes to set the breading, then increase heat to 375°F for 2-3 minutes until golden. Another trick: chill the shaped croquettes for 30 minutes before frying—the colder filling browns faster and creates a crispier crust.
Can I use ground turkey or chicken instead of beef?
Ground turkey or chicken works well, but you'll need to adjust the cooking time. Use 93% lean ground turkey and cook it until fully done (no pink). For chicken, add 1 extra tablespoon of flour to the filling to help bind it. The flavor will be lighter but still delicious—great for a lighter version.
How do I make these gluten-free?
Replace the flour with 1.5 cups gluten-free all-purpose flour blend and use gluten-free panko for breading. For the egg wash, mix 2 gluten-free eggs with 1 tablespoon water for better adhesion. The texture will be slightly different but still crispy. Always check your gluten-free flour blend contains xanthan gum for best binding results.
What's the best way to reheat leftover croquettes?
Reheat in an air fryer at 375°F for 3-4 minutes or in a 350°F oven for 8-10 minutes until crispy again. For stovetop, use a non-stick pan with 1/4 inch of oil> and heat for 2-3 minutes per side**. Microwaving will make them soggy—avoid this method completely.