
Main Courses
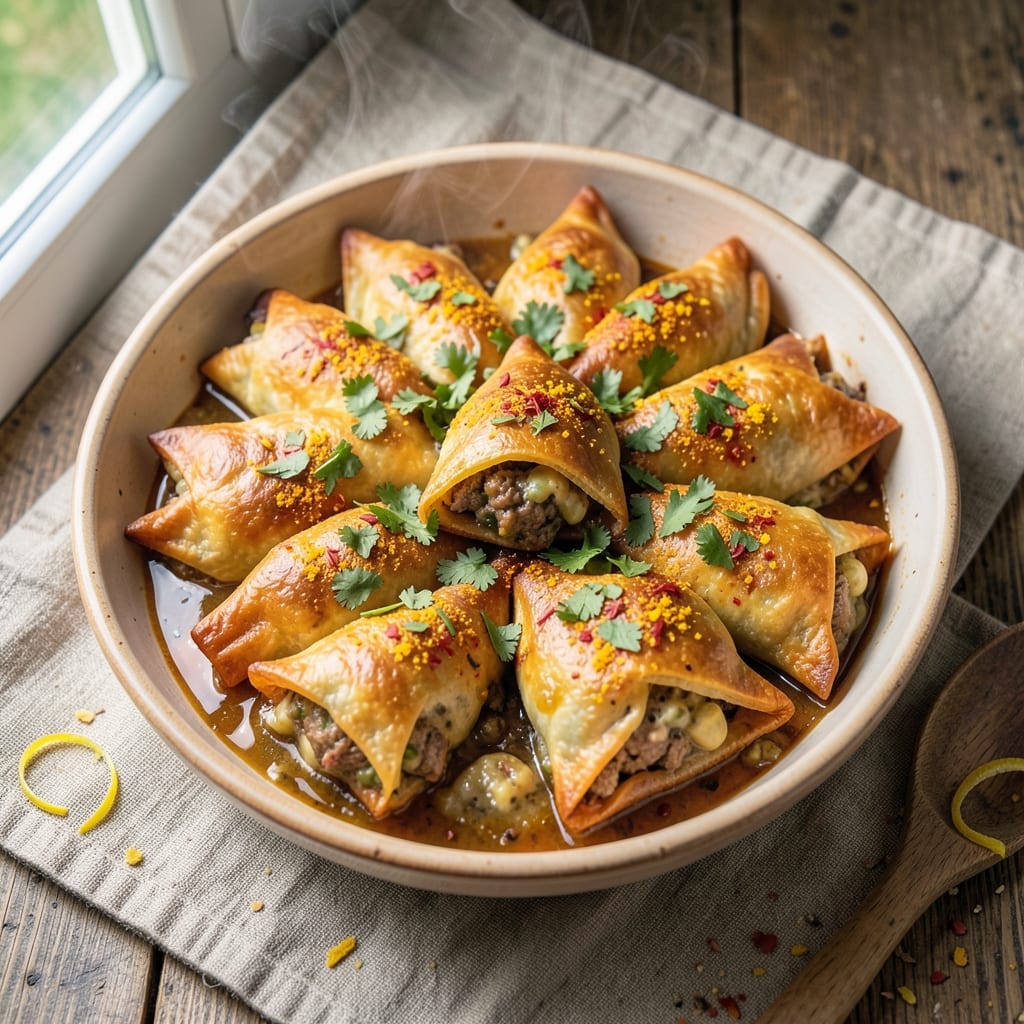
This baked beef samosa recipe delivers all the crispy, spiced magic of traditional samosas without the frying—perfect for a restaurant-quality meal at home. The secret lies in a delicate balance of flaky, golden layers and a richly spiced beef filling that stays tender and flavorful. I developed this version after years of perfecting the art of samosa-making, ensuring every bite delivers that satisfying crunch and aromatic depth.
The recipe begins with a foolproof dough that combines all-purpose flour, butter, and a touch of baking powder for that signature flakiness. While the dough rests, you'll prepare the filling—a fragrant blend of ground beef, warming spices like cumin and coriander, and a hint of garam masala that ties everything together. The filling is then carefully folded into the dough, creating those iconic triangular shapes before baking to a golden, crisp finish.
What makes this recipe truly special is how it captures the essence of traditional samosas while adapting to modern techniques. The result is a crispy shell that holds up beautifully to baking, paired with a filling so flavorful it melts in your mouth. Serve with a cooling mint chutney or tangy tamarind sauce to balance the richness, and you’ve got a dish that’s as impressive as it is delicious.
Whether you're feeding a crowd or treating yourself to a special meal, these baked beef samosas are a game-changer. They’re perfect for lunch gatherings, dinner parties, or even a comforting weeknight dinner—all while keeping the kitchen mess to a minimum. Let’s get started on creating these crispy, spiced delights!
Ingredients for baked beef samosa
Foolproof dough meets aromatic spiced beef for restaurant-quality samosas—no frying required.
| Ingredient | Amount | Notes |
|---|---|---|
| All-Purpose Flour 🌾 | 2 ½ cups | For flaky, golden layers |
| Unsalted Butter 🧈 | ½ cup | Cold, cubed for flakiness |
| Baking Powder 🍞 | 1 tbsp | For light, airy texture |
| Salt 🧂 | ½ tsp | Diamond Crystal preferred |
| Ground Beef 🥩 | 1 lb | 70/30 fat ratio preferred |
| Yellow Onion 🧅 | 1 medium | Finely diced (about 1 cup) |
| Garlic Cloves 🧄 | 4 cloves | Minced for aromatic depth |
| Ginger 🌿 | 1 tbsp | Freshly grated |
| Green Chilies 🌶️ | 2 whole | Finely chopped, adjust to taste |
| Garam Masala 🌶️ | 1 tbsp | For authentic warmth |
| Ground Cumin 🌿 | 1 tsp | Toasted for deeper flavor |
| Ground Coriander 🌿 | 1 tsp | Brightens the filling |
| Turmeric Powder 🌶️ | ½ tsp | For vibrant color |
| Fresh Cilantro 🌿 | ¼ cup | Chopped, for freshness |
| Lemon Juice 🍋 | 1 tbsp | Brightens the filling |
The dough is where the magic happens. All-purpose flour and cold cubed butter create those signature flaky layers—don't skip chilling the dough between folds. I always grab Land O'Lakes unsalted butter from the grocery store's dairy section, but European-style butter like Plugrá works even better if you want to splurge. For the filling, ground beef with 70/30 fat ratio is non-negotiable—it stays juicy while baking. If you can't find it, 80/20 works but expect slightly drier results. The onions should be finely diced (about 1 cup from 1 medium onion), and the garlic? Freshly minced makes all the difference—pre-minced garlic just won't cut it here.
No garam masala? Mix 1/2 tsp each of cinnamon, cardamom, and cloves for a DIY version. Fresh ginger is ideal, but dried ginger at half the amount works in a pinch. The green chilies can be swapped for jalapeños if you prefer more heat. For the dough, if you're short on butter, vegetable shortening works but lacks flavor. The baking powder is crucial—aluminum-free is best for consistent results. Fresh cilantro adds brightness, but dried cilantro at 1/4 the amount gets you close if you're in a bind. The lemon juice? Freshly squeezed is best, but bottled works if you're short on time.
The dough keeps best wrapped in plastic in the fridge for up to 3 days, though it's best used within 24 hours for maximum flakiness. The filling can be prepped ahead and stored in the fridge for 2 days—just fold and bake when ready. For make-ahead convenience, assemble the samosas, wrap tightly in plastic, and freeze for up to 1 month. Bake straight from frozen, adding 5-7 minutes to the cooking time. Once baked, they reheat beautifully in a 350°F oven for 10 minutes—crispy shell intact, filling still warm and flavorful.
Why You'll Love This Recipe
- No Frying Needed: I’ll admit, I used to dread the oil splatter of deep-frying—but this version skips it entirely. The butter-baked crust gets just as crispy, and honestly? Less mess on my countertop.
- Spiced Beef Magic: That ground beef gets a punch of cumin, coriander, and a hint of garam masala, then baked until tender. It’s not your usual dry chili beef—it’s got layers, like a warm hug in every bite.
- Weeknight to Party: Same dough, same filling, but different vibes: serve these with mint chutney for a quick weeknight dinner or pile them on a platter for game day. The baking powder keeps the crust light, so they’re never a flop.
- Budget-Friendly Leftovers: A single batch feeds four, and the leftovers reheat beautifully—crispy edges intact. Between us, this is my go-to for lunchboxes or a lazy Sunday brunch. (Yes, even with kids.)
Step-by-step instructions for baked beef samosas
Here's how to achieve that perfect balance of golden, crispy layers and aromatic spiced filling.
Prepare the Flaky Pastry Dough
In a large mixing bowl, combine the 2.5 cups all-purpose flour and 0.5 tsp salt. Cut in the 0.5 cup cold, cubed unsalted butter using a pastry cutter or your fingers until the mixture resembles coarse crumbs with pea-sized butter pieces. This creates the flakiness we're after.
Add the 1 tbsp baking powder and mix gently with a fork until just combined. Gradually add 2-3 tablespoons ice water, one tablespoon at a time, mixing lightly with a fork until the dough comes together. Be careful not to overwork it - just until it holds when pressed. Shape into a disk, wrap in plastic, and chill for 30 minutes in the refrigerator.
This chilling step is crucial. It firms up the butter so it doesn't melt during baking, which would prevent those beautiful flaky layers from forming. The dough should be pliable but not sticky when you're ready to roll it out.
Cook the Spiced Beef Filling
In a large skillet over medium-high heat, cook the 1 lb ground beef until browned, breaking it apart with a wooden spoon. Drain any excess fat, leaving about 1 tablespoon in the pan for flavor.
Add the 1 medium finely diced yellow onion and cook for 3-4 minutes until softened. Stir in the 4 minced garlic cloves, 1 tbsp freshly grated ginger, and 2 finely chopped green chilies, cooking for another 1 minute until fragrant. This aromatic base forms the flavor foundation for our filling.
Add the 1 tbsp garam masala, 1 tsp ground cumin, 1 tsp ground coriander, and 0.5 tsp turmeric powder, stirring constantly for 30 seconds to toast the spices and release their oils. Pour in the 1 tbsp lemon juice and cook for another 2 minutes. Remove from heat and stir in the 0.25 cup chopped fresh cilantro. Let the filling cool completely before assembling.
Assemble and Bake the Samosas
Preheat your oven to 375°F. On a lightly floured surface, roll out the chilled dough to about 1/8-inch thickness. Cut into 4-inch circles using a round cutter or plate. Place a generous 2-tablespoon portion of the cooled beef filling in the center of each circle.
Fold one side of the circle over the filling, then fold the opposite side over to form a half-moon shape. Seal the edges by pressing firmly with your fingers or using a fork to crimp. Place the assembled samosas on a parchment-lined baking sheet, seam-side down.
Brush the tops with a little melted butter for extra browning. Bake for 25-30 minutes until the samosas are deep golden brown and crispy. For extra crispiness, broil for 1-2 minutes at the end, watching closely to prevent burning.
Serve Warm with Traditional Accompaniments
Let the samosas rest for 5 minutes before serving to allow the filling to set slightly. The exterior should be crispy enough to stand up to a fork, while the filling remains moist and flavorful.
Serve warm with mint chutney or tamarind sauce for dipping. The contrast between the crispy exterior and tender, spiced filling makes each bite irresistible. For an authentic touch, serve with a side of raita or pickled onions to balance the richness.
Pro Tips For Making Baked Beef Samosa
- Chill the Dough First: After kneading your flour-butter mixture, wrap it in plastic and refrigerate for at least 30 minutes. I learned this the hard way—skipping it makes the dough too soft, and those samosas puff up unevenly or collapse when baking. Cold dough holds its shape better, and the butter stays in little pockets for that melt-in-your-mouth texture.
- Brown the Beef Properly: Don’t just cook the ground beef—sear it in batches over medium-high heat until the edges are dark brown, breaking it apart with a spoon. This adds depth of flavor that raw or lightly cooked beef won’t give. (Yes, even if you’re impatient like me, resist the urge to rush this step.)
- Vent Those Samosas: Before sealing the edges, poke a small slit in the top of each samosa with a sharp knife or the tip of a skewer. This lets steam escape, preventing them from splitting open when the filling expands. Trust me, you’ll thank yourself when they come out intact and golden.
- Use Cold Butter for Layers: Cut your unsalted butter into small cubes and freeze them for 10 minutes before mixing into the flour. This creates distinct, flavorful layers that melt during baking instead of blending into a greasy mess. (I was skeptical until I tried it—now I never skip this.)
Troubleshooting this recipe
Dough Too Sticky
If your dough feels too sticky after mixing, you likely added too much water. The key is to use just enough to hold the dough together when pressed—about 2-3 tablespoons total. For extra insurance, chill the dough for an additional 15-20 minutes before rolling. If it's still sticky, sprinkle a little more flour on your work surface, but avoid overdoing it—too much flour makes the dough tough. 💡
Filling Too Dry
A dry filling usually means the beef lost too much moisture during cooking. To fix this, reduce the cooking time slightly when browning the beef—aim for medium heat instead of high. Also, add 1-2 tablespoons water or beef broth to the filling while cooking to keep it moist. If the filling is already dry, mix in 1 teaspoon yogurt or lemon juice before assembling to restore juiciness.
Samosas Not Crispy
Crispiness depends on proper baking and butter distribution. First, ensure your dough has cold, evenly distributed butter—this creates steam during baking, leading to flakiness. Brush the tops with melted butter before baking for extra browning. If they're still soft, bake at 400°F for 5-10 minutes longer, rotating the tray halfway. For a restaurant-style finish, broil for 1-2 minutes at the end, watching closely to avoid burning. ✨
Filling Leaking
Leaky samosas usually mean the dough wasn't sealed properly or the filling was too wet. Press the edges firmly to create a tight seal—use your fingers or a fork to crimp them. If the filling is still too wet, chill it for 10 minutes before assembling to help it firm up. Another trick? Place the assembled samosas on a wire rack over a baking sheet—this allows heat to circulate evenly and prevents soggy bottoms.
Uneven Baking
If some samosas bake faster than others, rotate the baking sheet halfway through cooking. Overcrowding the tray also traps steam, leading to uneven browning. Leave at least 1 inch of space between samosas. For extra evenness, bake on the middle rack where heat is most consistent. If your oven runs hot, reduce the temperature by 25°F to prevent over-browning. 🌡️
Dough Too Tough
Overworking the dough or using too much flour makes it tough. Handle the dough gently—just until it holds together. If it's already tough, try adding 1 tablespoon cold milk or water to soften it slightly. For a lighter texture, ensure your butter is cold and cubed (not melted) when cutting it into the flour. If the dough feels dry, knead in ½ teaspoon milk or water at a time until pliable.
Nutrition facts
Frequently asked questions about baked beef samosas
Can I make these samosas gluten-free?
Yes, but you'll need to substitute the all-purpose flour with a 1:1 gluten-free flour blend (like Bob's Red Mill) and add 1/4 tsp xanthan gum to mimic the dough's structure. The baking powder amount stays the same, but chill the dough 45 minutes longer since gluten-free doughs can be more delicate. The filling recipe remains identical.
How do I prevent the samosas from getting soggy?
Three key steps: 1) Cool the filling completely before assembling (warm filling steams the dough). 2) Brush the tops with melted butter before baking for extra crispiness. 3) Bake on a wire rack over a baking sheet—this allows heat to circulate underneath and prevents moisture buildup. For extra insurance, bake at 350°F instead of 375°F.
What's the best way to reheat baked samosas?
For maximum crispiness, reheat in a 375°F oven for 8-10 minutes on a wire rack. If using a toaster oven, set to 350°F for 5-7 minutes—this maintains the shell's texture better than microwaving. Avoid air fryers as they can make the exterior too hard. For a quick fix, place samosas on a baking sheet and broil for 1-2 minutes (watch closely!).
Can I use ground turkey instead of beef?
Ground turkey works beautifully—just use 93% lean turkey to match the beef's fat content. For extra moisture, add 1 tablespoon chicken broth to the filling. The cooking time remains the same, but turkey samosas may need 2-3 minutes longer in the oven to ensure the filling is fully cooked. The flavor will be slightly lighter but equally delicious.
Why does my dough look like it has holes?
Holes typically appear from overworking the dough or using too much water. Handle the dough gently—just until it holds together. If holes appear during rolling, sprinkle a little flour on your work surface and use a rolling pin to gently press out the air. For extra flakiness, fold the dough once more after the initial 30-minute chill (this creates more layers).